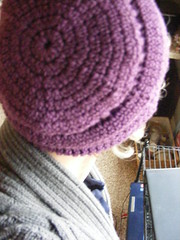
October 26, 2015

Shopping Cowl

I was walking through Target and it drew my attention almost immediately. They are currently selling the softest, loveliest cowls which are made large and giant, and I knew that I wanted something just like that, if not that itself. Then I was at Hobby Lobby and I saw the perfect colored thick squishy yarn for me for this season. I generally make a new scarf or cowl every time the temperatures start to drop in a year, and this one was no exception. Because of all the shopping involved in the inspiration of this project, the name was sort of a no-brainer. I am pleased to introduce you to the: Shopping Cowl.


March 18, 2015

Squints

I first saw Melody of BGC wearing a hat like this in one of her videos of The Walk class. Not exactly, of course, because it was knit. But I loved the way it looked, which was comfy and squishy. I saw a few similar knit ones on Pinterest, and decided it was time for a crochet one. It took me a bit to get the right look, I have another hat in the other room that didn't quite go where this one did as proof. But once I remembered the extended single crochet stitch (link to video if it's new to you) I knew it would work. I'm thrilled with the result and I hope you are as well!

007 008
005 004


Used a G hook and yarn from my stash.

exsc : extended single crochet : Insert hook in indicated stitch, yo, pull up loop, yo, pull through 1 loop on hook, yo, pull through 2 loops on hook.

fpsc : front post single crochet
sc : single crochet
tc : turning chain

Chain 2.
Row 1: in second chain from hook, exsc 12 times, join with first exsc (12 stitches)
Row 2: chain 2, 2 exsc in each stitch, join wtih first exsc (24 stitches)
Row 3: chain 2, * exsc, 2 exsc, repeat from * around, join with first exsc (36 stitches)
Row 4: chain 2, exsc around, join with first exsc (36 stitches)
Row 5: chain 2, * exsc, exsc, 2 exsc, repeat from * around, join with first exsc (48 stitches)
Row 6: chain 2, * exsc, exsc, exsc, 2 exsc, repeat from * around, join with first exsc (60 stitches)
Row 7: chain 2, * exsc, exsc, exsc, exsc, 2 exsc, repeat from * around, join with first exsc (72 stitches)
Row  8: chain 2, exsc around, join with first exsc (72 stitches)
Rows 9-11: chain 1, * fpsc, sc, repeat from * around, join in tc (73 stitches now counting tc)
Rows 12-15: chain 2, exsc around, join with tc
Rows 16-18: chain 1, * fpsc, sc, repeat from * around, join in tc
Rows 19-22: chain 2, exsc around, join with tc
Rows 23-25: chain 1, * fpsc, sc, repeat from * around, join in tc
Rows 26-29: chain 2, exsc around, join with tc
Rows 30-33: chain 1, * fpsc, sc, repeat from * around, join in tc
Row 34: chain 1, sc around, join in first sc

March 16, 2015

Flapper

Simply put, I wanted some hats that weren't extremely warm so that on bad hair days I would have more of a choice than just baseball hats. I wasn't sure where I was going when I started this one, I simply knew I had a small amount of yarn out of my stash I wanted to play around with. I really do love the way this came out. I hope you do too!

009 011
013 020

G hook
Used Lion Brand Heartland

This hat is worked inside out.

chain 2
Row 1: in second chain from hook dc 11 times (11 stitches)
Row 2: chain 2, in each stitch across place 2 dc, join to first dc (22 stitches)
Row 3: chain 2, *dc, 2 dc in next stitch, repeat from * around, join to first dc (33 stitches)
Row 4: chain 2, *dc, dc, 2 dc in next stitch, repeat from * around, join to first dc (44 stitches)
Row 5: chain 2, *dc, dc, dc, 2 dc in next stitch, repeat from * around, join to first dc (55 stitches)
Row 6: chain 2, *dc, dc, dc, dc, 2 dc in next stitch, repeat from * around, join to first dc (66 stitches)
Rows 7 - 16: chain 2, dc around, join to first dc (66 stitches)
Rows 17 - 20: chain 2, (in separate stitches) 2 hdc, 30 sc, 2 hdc, 32 dc, join to first hdc (66 stitches)
Rows 21 - 22: chain 2, sc around, join to first sc (66 stitches)

Turn hat inside out. Fold the flap up and sew button to hold it in place.

January 19, 2015

Cabled and Cinched Head warmer

My daughter in law and I sent Pinterest pictures back and forth working out exactly what she wanted, and the result was this Cabled and Cinched Head warmer.

Cabled and Cinched Head warmer 2

I used Wool-ease Thick and Quick so it's really lovely and warm, but the pattern could be easily adjusted to work with any yarn. The finished product was 5.5 inches wide and 20 inches long. Again, work it longer if needed, and use a smaller hook for a thinner head warmer. You can even leave off the cinching if you wish, placing the seam in the back. It's all good. Now, to the pattern:

Cabled and Cinched Head warmer 3

Cabled and Cinched Head warmer

Notes: ignore the turning chains completely;
          fpdc: front post doublr crochet; bpdc: back post double crochet; hdc: half double crochet;
          leave a long tail when you create the chain, this will be used to seam the two ends;

Hook: K (6.5)

Row 1: chain 14
Row 2: in second stitch from hook dc and continue across, chain 2 (12 dc)
Row 3: fpdc, fpdc, hdc, hdc, fpdc, fpdc, fpdc, fpdc, hdc, hdc, fpdc, fpdc, chain 2
Row 4: bpdc, bpdc, hdc, hdc, (skip 2 stitches) bpdc, bpdc, (go back to the 2 skipped stitches) bpdc, bpdc, hdc, hdc, bpdc, bpdc, chain 2
Row 5: repeat Row 3
Row 6: bpdc, bpdc, hdc, hdc, bpdc, bpdc, bpdc, bpdc, hdc, hdc, bpdc, bpdc, chain 2
Repeat Rows 3-6 7 times
Fasten off, leave a tail.

With the long tail from the chain seam the two short ends together to form a circle.
With the tail from the last row cinch the head warmer. I did this by pulling the yarn up after the first two rows of cables, down before the cable braid, up after the cable braid, down before the last two rows of cable, and back up on the edge of the warmer, tighten so it cinches together, and then knot.

At this point wrap the yarn around the cinched spot to your desired thickness.

Cabled and Cinched Head Warmer 1

This is my first time writing a cabled pattern, so please let me know if this doesn't make sense. Thank you so much.