

This:
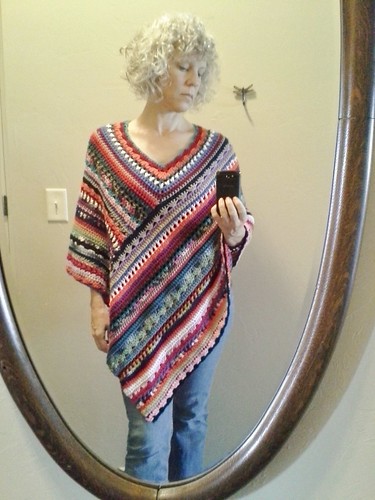
was such fun to make. My inspiration actually came from this knit (I believe) poncho. When I shared the project on Ravelry I was informed it looked a lot like Buckster's Fall Poncho, and I so agreed! Look at this amazing pattern you can get if you knit! Doesn't it look like the one I linked to?? Yep! When I made mine I was determined to only use left over yarn I already had, and apparently my yarn is sometimes quite... bright. But you know, while this is a little outside of my normal wear, I think it will be a fun wear on days I need a little extra punch, and it's like wearing a cloud it's so comfortable!
the Molly Poncho.
Why Molly? Because as I was making it and watching the colors come together it reminded me of Molly Weasley's sweater from Harry Potter. The final result simply reminded my husband of a Mexican Poncho, which really I guess that's exactly what it is. As I said, this was my inspiration.
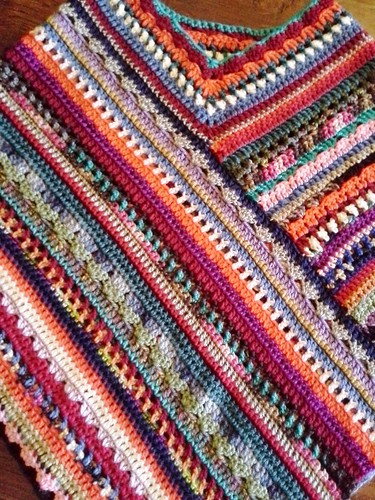
Using a G hook I made two rectangles approximately 33x16 each. I made a chain 33 inches long, which was a 121 stitch chain making the first row in both rectangles as sc row.
These are the different rows I used to create the look.
Row A: sc across
Row B: dc across
Row C. *sc, chain 3, skip a stitch*, end with sc
Row D: dc, *dc, chain 1,* end with two dc
Row E: 2dc, *skip 3 stitch, 4 dc*, end with 2 dc
Row F: 2 dc, *skip 2 stitches, 2 dc, 2 dc*, end with 2 dc
Repeat between * * to work across the row.
I mixed these rows up in no particular order, with no planned repetition as I went. I used a variety of colors with little repetition there as well, simply choosing out of the stash I had, until both rectangles were 16 inches wide.
Then I sewed the end of one rectangle (a) to the bottom side of the other rectangle (b). Then I did the reverse sewing the end of b to the bottom side of a. You can seam them in whatever way you wish, slip stitch, sc, ect. What I did was take the yarn from finishing off each row and used it to tie the end to the edge, knotting the yarn, and then weaving in the remaining yarn. Once the ends are attached weave in all the remaining ends.
This created a poncho which was too big, which was my goal.
From this point I filled in at the neck. I first did some short rows in the "back" as you can see in this picture. It allowed the back to be higher than the front once I started the neck rounds, more like a sweater neckline than a poncho neckline.

After that when I went in rounds I would decrease stitches at the front V, and at each side of the short rows. I have no specific pattern for those, as I simply worked with each row to my best ability. I continued with the final round trying the poncho on each round until I had it at the size I felt was most comfortable.
This is a very freeform style of crochet, and I'm sorry I don't have more exact directions for you. If you give it a try though I would LOVE to see your result.
I would also LOVE to know which charity you send items to. I'll remind you of the challenge when August begins. I wanted to give you time to get your supplies and plans together before then.