November 24, 2014

Tailored Shell Mitts

After searching the internet for the right fingerless mitts and not being able to make the other patterns I found work with the yarn I chose, I settled down and got busy creating a new one. I love the way these came out with the shell pattern through the majority of the yarn, and fitting the thumbs as well. It fits an average woman's wrist and is made with an Aran yarn, they are comfy, fitted, and warm.

DSCF1009

DSCF1004 DSCF1005

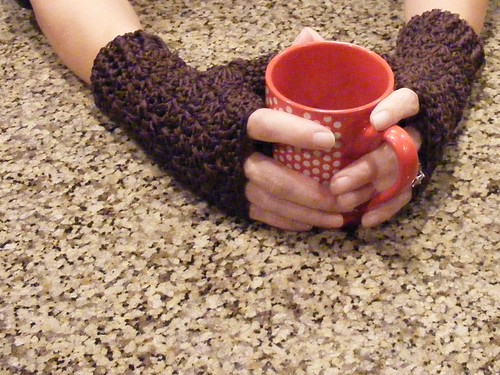
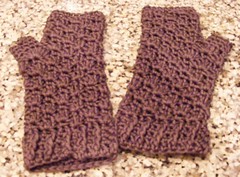
Yarn used: Plymouth Yarn Covington (Brown) (100 yards)
Hook used: G

chain 23, join to form a circle.

Row 1: ch 2, dc across, join in turning chain
Row 2: ch 2, * fpdc, hdc, repeat from * around, join in turning chain
Row 3: ch 2, * fpdc in fpdc, hdc in hdc, repeat from * around, join in turning chain
Repeat Row 3 once.
Row 5: ch 2, 1 dc in same stitch, * skip one space, sc, skip one space, 3 dc shell in next stitch, repeat from * around ending with 1 dc in the beginning stitch, join in turning chain
Row 6: sc in turning chain, * 3 dc shell in sc, sc in middle dc of next shell, repeat from * around, join in first sc
Row 7: ch 2, 1 dc in same stitch, * sc in middle dc of next shell, 3 dc shell in sc, * around ending with 1 dc in the beginning stitch, join in turning chain
Repeat rows 6 and 7 two times
Row 12: sc in turning chain, * 3 dc shell in sc, sc in middle dc of next shell * , 5 dc shell in sc, sc in middle dc of next shell, 5 dc shell in sc, sc in middle dc of next shell, repeat between * 3 times, join in first sc
Row 13: ch 2, 1 dc in same stitch, sc in middle dc of next shell, * 5 dc shell in sc, sc in middle dc of next shell, repeat from * 2 times, [ sc in middle dc of next shell, 3 dc shell in sc ], repeat twice, sc in middle dc of next shell, 1 dc in beginning stitch, join in turning chain
Row 14: sc in turning chain, 3 dc shell in sc, [ sc in middle dc of next shell, 7 dc shell in next sc ], repeat once, * sc in middle dc of next shell, 3 dc shell in sc, repeat from * two times, join in first sc
Row 15: ch 2, 1 dc in same stitch, sc in middle dc of next shell, sc in 3rd dc of 7 shell, skip all stitches to 3rd dc of 7 shell and sc in that stitch (thumb hole made), * 3 dc shell in next sc, sc in middle dc of next shell, repeat from * two times, 1 dc in beginning stitch, join in turning chain
Repeat Rows 6 and 7 five times.
Repeat Row 6 one more time.
Row 22: ch 1, sc around in each stitch, join in turning chain, fasten off.

Thumb:
Join yarn anywhere on thumb opening and sc around which will be 10 stitches.
Chain 1, sc around, join to turning chain
Chain 1, sc around, fasten off.

Weave in all threads.


Please let me know if anything doesn't make sense, or match up. Sometimes my notes make sense to my brain but not to others. I love it when you help me find those times, and appreciate the assistance in making the pattern more understandable.

November 14, 2014

Crocheted Rosa

I saw the original knitted Rosa on Pinterest, which leads to the Ravelry pattern which is free. Honest, if you knit this would make a great Christmas present for someone! If you crochet I have made my own version of it I am sharing here. It's not exactly the same because the knit crochet stitch isn't reversible, and it needed to be reversible. I ended up using the Mixed Cluster Stitch, which I found on New Stitch a Day. Have you seen this site before? It's an awesome collection of knit and crochet stitches with video to show you the stitch as well.

009 Crocheted Rosa

MC (Mixed Cluster): yo, insert hook into first st as indicated, yo, draw loop through, yo, draw through 2 loops, skip 1 st, [yo, insert hook into next st, yo, draw loop through] twice all in the same st, yo, draw through all 6 loops on hook.

J hook
2 skeins Bernat Super Value (Winter Sky)
.5 skein Bernat Super Value (True Gray)
button of your choice

Measurements: 11.5in x 79.5in

NOTE: if the button can slide between the stitch pattern the button hole in row 145 does not need to be made.

Chain 36
Row 1 Skip 2 ch (count as 1 sc), sc across in each stitch, turn
Row 2 2 ch (count as hdc), 1 MC inserting hook into 1st and 3rd stitches, 1 ch, * 1MC inserting hook into second stitch of prior MC first, 1ch, rep from * ending last MC in last stitch (not turning chain), chain 1 then hdc in last stitch as well, turn
Row 3 1 ch, skip 1 st, sc across in each stitch including top of tch, turn
Repeat Rows 2 and 3 52 times
Repeat Row 2
Change colors
Row 108 join new yarn in hdc with a sc, sk st, sc across, turn
Repeat Row 2 and 3 18 times
Repeat Row 2
Row 145 1 ch, skip 1st stitch, sc in next 4 stitches, ch 3 (or # stitches just smaller than the button you have chosen), skip the same number of stitches, sc across, turn
Repeat Row 2 and 3 twice (work in the chain stitch of Row 145 as if they were normal stitches)

Finish off, weave in ends.

Sew the button on the opposite side and corner as the button hole was placed, approximately 3 inches in from the edge.

For more pictures check out my Ravelry page for this project. If you have any questions or find any of this pattern confusing please let me know so that I can clarify for you and others. Thanks so much! And thank you Anne for the amazing inspiration!


November 6, 2014

Easy Peasy Skull Cap

easy peasy skull cap

I created this because I wanted a pattern which was easy to follow; something I could work on while watching television. The hats in the picture above are sized Young Child, Toddler, and Newborn respectively. If you have any questions about this pattern please ask away!

Sizes:
Newborn follow Rounds 1-3 then skip to Rounds 6 - 11 then the last two Rounds.
Toddler follow Rounds 1-4 then skip to Rounds 6-12 then the last two Rounds.
Young Child follow entire pattern.

Note: You can change yarns at any time during this pattern to give your hate whatever look you are wanting. You can see in the picture above three different examples of how I have changed the yarns.

Use a G hook
Ch 2
Round 1 - In first chain, 12 dc, join with slst to 1st dc, ch 2
Round 2 - In each dc place 2dc around, join with slst to 1st dc, ch 2 (24 stitches)
Round 3 - *1 dc in first dc, 2dc in next dc. Repeat from * around, join with slst to 1st dc, ch 2 (36 stitches)
Round 4 - *1 dc in two dc, 2dc in next dc. Repeat from * around, join with slst to 1st dc, ch 2 (48 stitches)
Round 5 - *1 dc in three dc, 2dc in next dc. Repeat from * around, join with slst to 1st dc. Ch 2 (60 stitches)
Rounds 6 to 14 - dc in each dc around, join with slst to 1st dc.
Second to last Round: sc in every dc around, join with slst to 1st sc. Ch 1.
Last Round: sc in every sc around
Fasten off and sew in any ends.


August 20, 2014

How I chain:

I was never fond of the beginning chains for crochet in the normal way it is taught. When you go through the top stitch for the first row it left an unfinished edge that was almost always tighter than the final edge of whatever project I was working on. It may have been the way I did it, but it always seemed to be the case.

Then they came out with the sc and dc foundation chains. It allowed the edge to be more flexible, but regardless of how many times I read the instructions and watched videos I still don't think I ended up doing it correctly.

Somewhere along the line I began to work in the beginning chain in the bottom of the stitch rather than in the top of the stitch. I simply flipped the chain over, and worked in the single "bump" all the way across.


012b

Here you can see the single stitch "bump" which is on the back, and when you work into that it leaves the full stitch you normally work in on the bottom. Now both edges of the project will look the same and will have about the same elasticity rather than the beginning chain being tighter.


July 16, 2014

A Molly Poncho and a Challenge for us all.


This:  20140715_083501

was such fun to make. My inspiration actually came from this knit (I believe) poncho. When I shared the project on Ravelry I was informed it looked a lot like Buckster's Fall Poncho, and I so agreed! Look at this amazing pattern you can get if you knit! Doesn't it look like the one I linked to?? Yep! When I made mine I was determined to only use left over yarn I already had, and apparently my yarn is sometimes quite... bright. But you know, while this is a little outside of my normal wear, I think it will be a fun wear on days I need a little extra punch, and it's like wearing a cloud it's so comfortable!

the Molly Poncho.


Why Molly? Because as I was making it and watching the colors come together it reminded me of Molly Weasley's sweater from Harry Potter. The final result simply reminded my husband of a Mexican Poncho, which really I guess that's exactly what it is. As I said, this was my inspiration.

20140715_083844

Using a G hook I made two rectangles approximately 33x16 each. I made a chain 33 inches long, which was a 121 stitch chain making the first row in both rectangles as sc row.

These are the different rows I used to create the look.

Row A: sc across
Row B: dc across
Row C. *sc, chain 3, skip a stitch*, end with sc
Row D: dc, *dc, chain 1,*  end with two dc
Row E: 2dc, *skip 3 stitch, 4 dc*, end with 2 dc
Row F: 2 dc, *skip 2 stitches, 2 dc, 2 dc*, end with 2 dc

Repeat between * * to work across the row.

I mixed these rows up in no particular order, with no planned repetition as I went. I used a variety of colors with little repetition there as well, simply choosing out of the stash I had, until both rectangles were 16 inches wide.

Then I sewed the end of one rectangle (a) to the bottom side of the other rectangle (b). Then I did the reverse sewing the end of b to the bottom side of a. You can seam them in whatever way you wish, slip stitch, sc, ect. What I did was take the yarn from finishing off each row and used it to tie the end to the edge, knotting the yarn, and then weaving in the remaining yarn. Once the ends are attached weave in all the remaining ends.

This created a poncho which was too big, which was my goal.

From this point I filled in at the neck. I first did some short rows in the "back" as you can see in this picture. It allowed the back to be higher than the front once I started the neck rounds, more like a sweater neckline than a poncho neckline.

20140715_083944

After that when I went in rounds I would decrease stitches at the front V, and at each side of the short rows. I have no specific pattern for those, as I simply worked with each row to my best ability. I continued with the final round trying the poncho on each round until I had it at the size I felt was most comfortable.

This is a very freeform style of crochet, and I'm sorry I don't have more exact directions for you. If you give it a try though I would LOVE to see your result.

I would also LOVE to know which charity you send items to. I'll remind you of the challenge when August begins. I wanted to give you time to get your supplies and plans together before then.

June 27, 2014

Morning Poncho Wrap


After I closed my etsy store I wrestled with if I should have. I had made a decision NOT to make any big decisions until 2015, and closing the etsy store was a pretty big decision. I closed it because I was overwhelmed with it, and sad that everything I had made was simply in storage. I don't know if those are good enough reasons, and I don't think I should have given myself more time, but I am where I am now. What thrilled me was the ability to donate my inventory to two great girls. The Bundle Up Club is gathering and creating hats, scarves, and blankets for the homeless this summer. I was able to meet the two wonderful girls behind the idea, their amazing mother, and help out a little. It made me happy to know that I had indeed made those items for someone in particular. I just needed the middle man to get them where they belonged. :)

But closing my store did not mean I put the hook away for good. I definitely took a break, but then inspiration hit, and I picked it back up.

This is the item which inspired my Morning Poncho Wrap, but I knew I wouldn't want something quite so long. I love the end result because it will keep me warm on cooler mornings and evenings as summer turns into fall. It's long enough to wrap around myself a little, but not so long that I am tripping over it or sitting on it.


5 3
2 1

I was asked by a friend to share the pattern, and since I didn't write anything down as I went this is what I believe I did by counting, measuring, looking, and remembering. :)

I used a G hook, and I believe Lion Brand Pound of Love Yarn but didn't use the entire skein.

{There have been edits made to the measurements. I apologize if this has caused you problems trying to make this poncho! Hopefully the new ones will help.}

I began making a chain 25 inches long. For me that was 53 stitch chain.
In the 5th stitch from the hook place one tr, *chain one, skip a stitch, and place a tr in the next stitch* across until you place a tr in the last stitch.
Chain 4, turn, *skip the chain, chain one, place a tr in the tr* across until you place a tr in the 3rd stitch in the turning chain.
Continue the rows in this manner until length desired. I went until my piece was 81 rows or about 68 inches long.
Fold the long rectangle you just made in half, and begin seaming from the two ends towards the fold for 20 rows. This can be done however you want, but see this picture for how I did it. I placed a sc in the top of the row, chained 4, placed a sc in the top of the row on the other side, and continued in this fashion. This will leave a large opening for the head.

6

(To help with understanding the seaming, I hope!)
Here is another picture. I have highlighted where I did the seam. I folded the poncho in half, and then seamed from the two edges on one side up about 20 rows. .


Around the head opening do the following:
place two sc in each turning chain and tr along the edge, join, turn
ch 3, place one dc in each sc across, join, turn
ch 3, place one dc in each dc across, finish off.

Along the edge of the wrap follow the same pattern that you did around the head opening. I did not edge along the backside.

Weave in all ends.

4
Please let me know if you don't understand something or if I didn't explain something well enough. Thanks!

April 23, 2014

The Janet Cowl


I originally made and sold this Cowl in my Etsy shop. I still love it so very much and thought I would share the pattern with those of you who might have loved the look of it as well.

blog open 2
{Pattern for flower NOT included}

Use G hook, and whatever yarn you desire. The final width and bulkiness of the cowl will be determined by yarn chosen. Yarn used in picture is Baby Bee Sweet Delight. Use a yarn needle to sew together, and weave ends in.

ch 60
Row 1: In 2nd ch from hook {sc, hdc, dc}, * skip 2 ch, in next ch {sc, hdc, dc}; repeat from * across, end with sc in last ch, ch 2, turn
Row 2: 1 dc in sc, * sk 2 st, in sc {sc, hd, dc}; repeat from * across, end with sc in last ch, ch 2, turn
Row 3: 1 dc in sc, * sk 2 st, in sc {sc, hd, dc}; repeat from * across, end with sc in tc, ch 2, turn
Repeat row 3 for pattern.

Continue until piece is approximately 31 inches long.

Finish off but leave a long tail on the last row. Using that tail join the last row to the first row, taking care to keep the pattern consistent.

Weave in ends.

If there are any questions PLEASE leave me a comment or send me an email.

All rights reserved ©2013 Stacey Daze and all content, including patterns, pictures, graphics and text are the property of Stacey Lozano. Do not sell or claim as your own work. Feel free to use this pattern for personal or commercial use.