
There was once a pic of an adorable little girl sporting the Boston Cowl which is a knit pattern you can purchase over at Ravelry. The picture was from Pinterest and eventually it simply broke. And since you can follow the link to see the picture, I decided to take the broken picture down. :) Back to the pattern.... While I have knit a couple of things in my life time, my general response to, "Can you knit?" is no. I prefer the hook, and it may simply be because I learned it first, but it's my love. (true) But so often they have these wonderful designs for knitters rather than crocheters. (also true)
For the past half year (about) I have only been crocheting Truth Wraps. I had stayed off of Ravelry, made no more sweaters, and just enjoyed the ripple. I was good with it, and enjoyed my evening hooking, but then I got back on Pinterest. (Oh the temptations galore!) And when I saw this cowl surrounding this little girl I knew I wanted to try to make one similar.
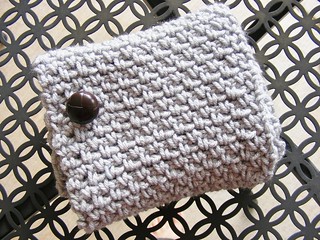


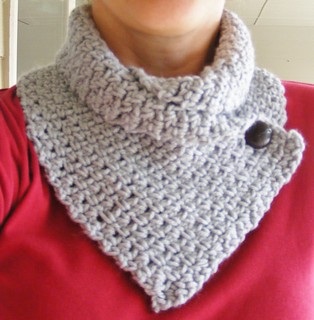

Are you interested in making this? (It's JUST a rectangle folks!) Maybe it's something you would like to add to your fall wardrobe? Well, here's what I did.
hook size - G
yarn shown - worsted weight, but any yarn will work with this pattern.
note: at the end of each row chain 1 for a turning chain. Ignore chain when working pattern.
row 1: sc base chain 21 (if you want this a different width just keep it with an odd number of stitches)
row 2: in the next 2 stitches place a sc, then skip the next stitch but chain 1, *sc in the next stitch, chain 1 and skip the next stitch*, across until 2sc in last two stitches
row 3: sc in the end stitch, skip the next stitch but chain 1, *sc in the next stitch, skip the next stitch but chain 1*, across until sc in last stitch
repeat rows 2 and 3 once
row 6: sc in end stitch, chain 2 (makes the button hole) skipping two stitches, sc in the next stitch, *chain 1 skipping a stitch, sc in the next stitch*, repeat until last two stitches and place sc in each of these
row 7: *sc in end stitch, skp a stitch and chain 1* across until you reach the chain 2 within which you will place a sc and 1 chain, then finish with sc
repeat rows 3 and 2 until length is to your satisfaction and end on a row 2.
The cowl in the picture is approximately 28in long.
Basically, you will be placing the sc in each chain from the row before.
Wrap scarf around your neck and figure out where you want the button to be. You will want to put it on the opposite edge from which the button hole was placed. (gosh I hope all of this makes sense!)
Wala! If you make it I would love to hear how it turned out! (There's nothing like googling the base chain for a video to share with y'all and realize I didn't do it quite like everyone else! HA! It's all good. Go learn it the correct way.)